LightSpeech is a text-to-speech application for macOS 10.8 and later. You select text in any app, and send it to the LightSpeech app which reads it out for you. LightSpeech can help you read long passages, chapters and even entire books. And the app keeps track of your reading statistics which may even motivate you to read more.
Why LightSpeech?
We all have a lot to read. Imagine if you had a way to read any article, any book - even cover-to-cover if you wish - without getting exhausted. What if you could read several books a month?
That’s what text-to-speech technology can do for you. It reduces the strain of reading, especially for the tough or boring content.
Text-to-speech (TTS) is more effective than reading silently too. When you use TTS, both your eyes and ears are engaged in understanding the text. That helps boost your comprehension. And TTS steadily churns through the material.
Yes, TTS is slower than skim reading, but it requires less stamina on your part, and results in higher comprehension. TTS is very effective for tough & dense content.
LightSpeech builds on text-to-speech features built into macOS in two key ways:
You can specify pronunciations, which is crucial for technical content. After all, you don’t want the voice to mispronounce the same words over and over again through the whole book! That would be incredibly frustrating.
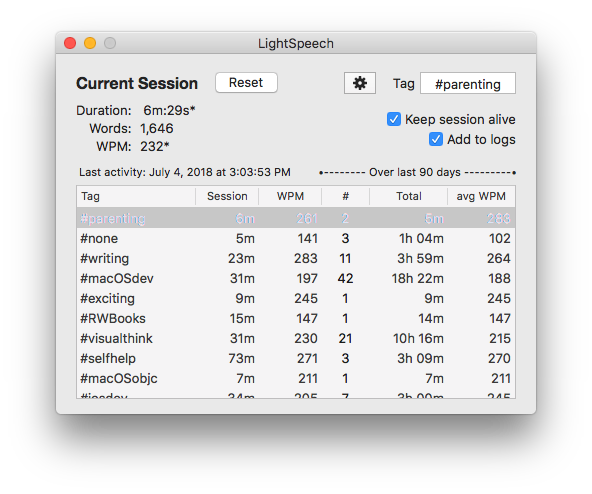
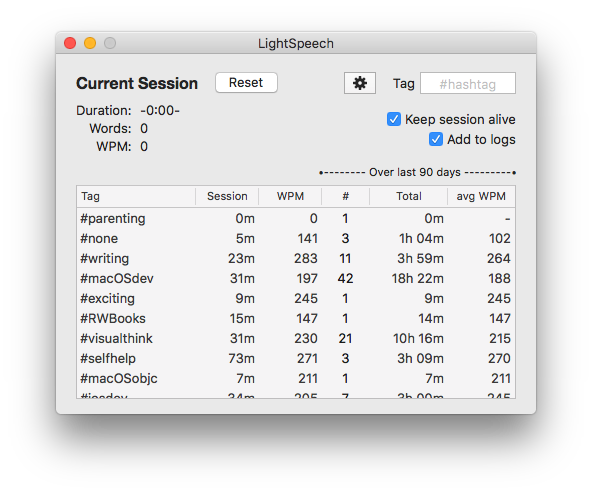
You can see your progress in terms of sessions of work completed. Each session is characterized by the duration and the average words per minute (WPM). For a serial reader, you want both to be high: read for longer durations and read faster. With clear metrics, you may feel motivated to push yourself.
In LightSpeech, use tags to identify your reading sessions. The app shows a summary of the sessions completed over the last 30 days.
Double-click on any row to set that as the active tag for the current session, or type a new tag in the text box.
I like to track my reading sessions in Excel, and I find it incredibly satisfying to read books cover to cover. For example, it took me 5.5 hours to read through the Presto Sketching book, and jot down notes on what I liked in each chapter. This way, when I want to review the chapter on visual frameworks for problem solving (Chapter 10), I know it will take me at most 45 mins to read through and understand the chapter. Using such a table and steadily filling it out motivates me to push through to finish reading a book.
How LightSpeech Works
You can select text in any app and send it to LightSpeech to read it.
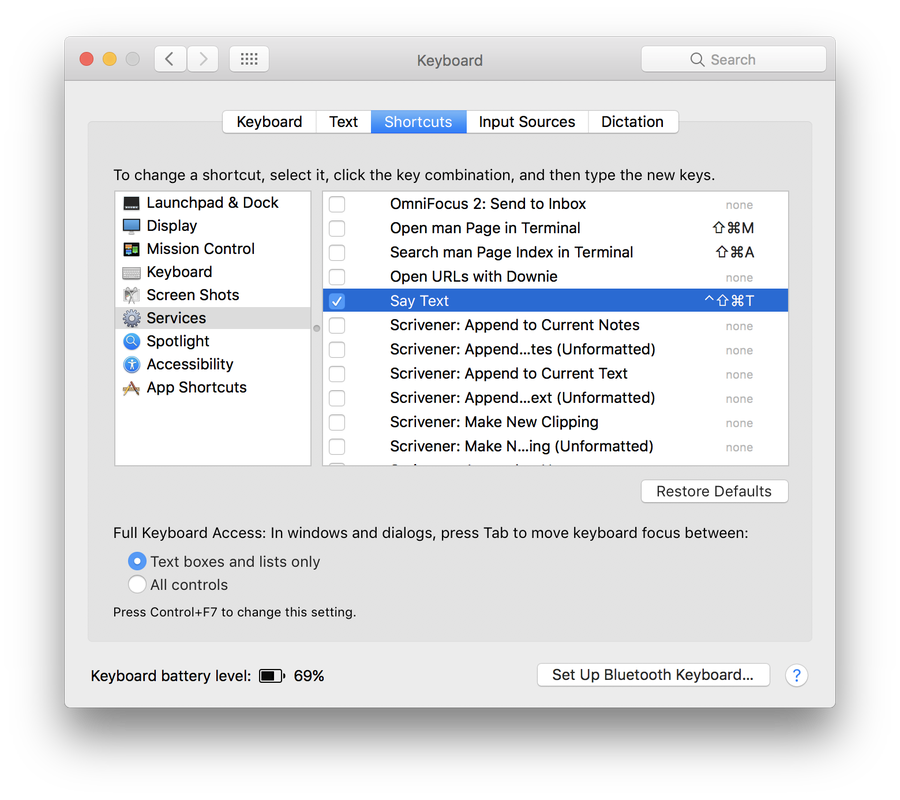
To do this, LightSpeech registers a macOS service that works with text. The service is called “Say Text” and when properly configured, it shows up in the System Preferences → Keyboard → Shortcuts → Services list.
Your Mac may show a list of tens of services, organized by category. The “Say Text” service is under the Text category since it operates on selected text.
With LightSpeech set up, you select text in any app, say you’re reading an article in Google Chrome or an EPUB in the Murasaki app, then you have any of three ways to invoke the Say Text service:
Right click and select the “Say Text” service
Go to the app’s menu, then Services → Say Text
Use a keyboard shortcut for the Say Text service, if you’ve assigned one. I’ve assigned the shortcut CTRL SHFT ⌘ T in the System Preferences → Keyboard → Shortcuts → Services list.
In fact, I use the BetterTouchTool utility to further simplify this. I’ve configured a simple gesture to invoke the Say Text service with the mouse. The gesture triggers the keyboard shortcut. Similarly PopClip is another utility that enables invoking the Say Text service immediately after selecting text. How to set up BetterTouchTool and PopClip to work with LightSpeech is discussed below.
Configure the LightSpeech macOS Service "Say Text"
To install LightSpeech, follow these steps:
Move the LightSpeech app into the /Applications folder
Log out of macOS, and then log back in. This is a cue for macOS to query apps such as LightSpeech on whether they provide any services.
Go to System Preferences → Keyboard → Shortcuts → Services to tick the box and enable the Say Text service. The default keyboard shortcut for the service is SHFT ⌘ S. Double-click to specify a new keyboard shortcut.
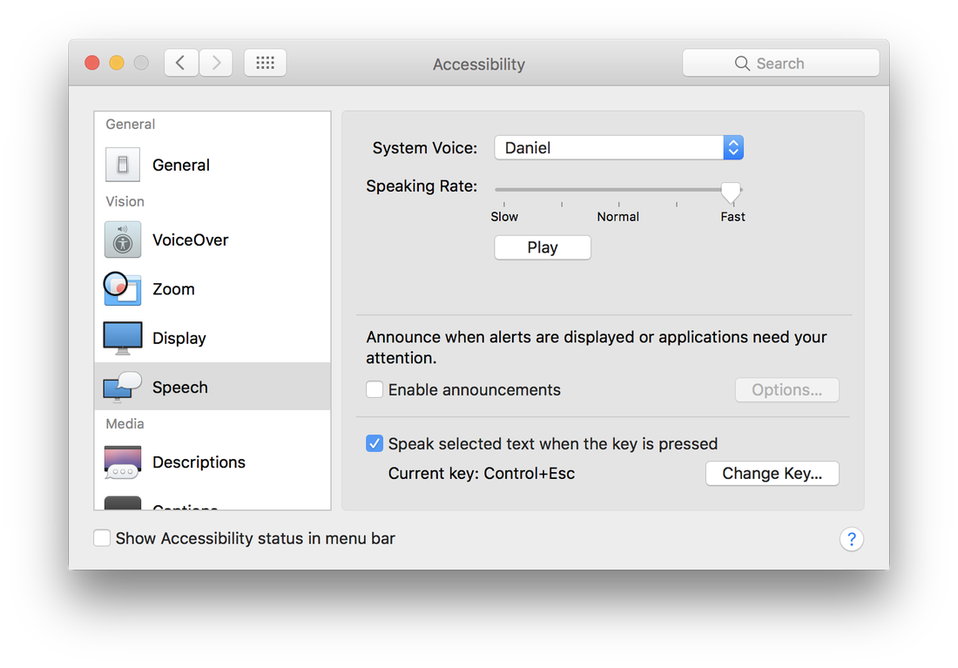
Next, go to System Preferences → Accessibility → Speech to select a text-to-speech voice. I like the Daniel (UK) and Samantha (US) voices.
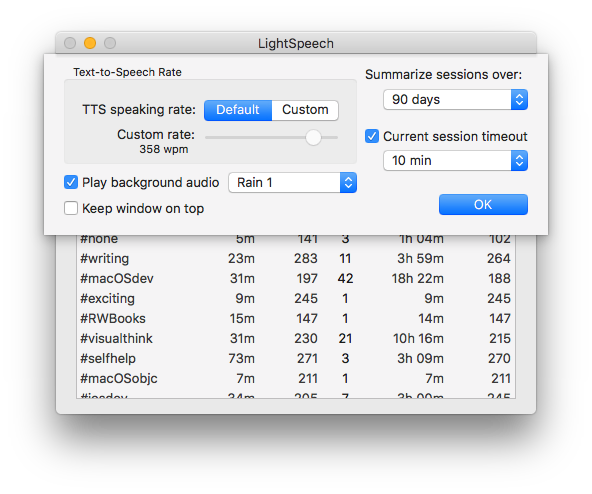
Use the Speaking Rate slider to specify the speed.
Use the Play button to test it out.
You can also specify the speaking rate within the LightSpeech app, in Preferences.
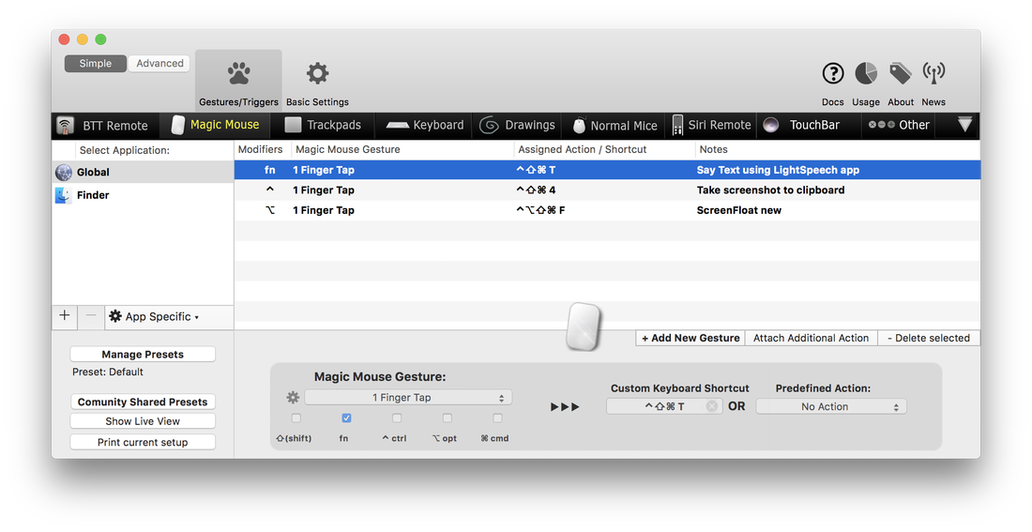
Invoke LightSpeech service with a Gesture using BetterTouchTool
BetterTouchTool is a handy utility app that makes it possible to use a mouse gesture to trigger a keyboard shortcut.
I’ve configured BetterTouchTool such that holding down the Fn key and a single tap on the Magic Mouse will trigger the keyboard shortcut for the Say Text service. I select text paragraphs to read with the mouse, and hold down Fn key and tap the mouse to have the text read aloud using the LightSpeech app.
Invoke LightSpeech service with PopClip
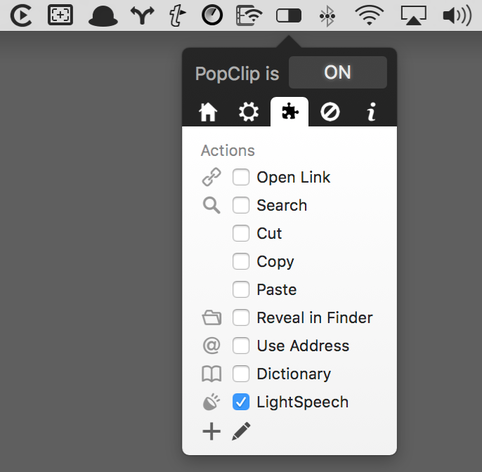
PopClip is a clever macOS utility that shows a popover when you select text. The popover shows relevant commands such as Copy, Search, etc. To this popover, you can add a command to send the selected text to LightSpeech.
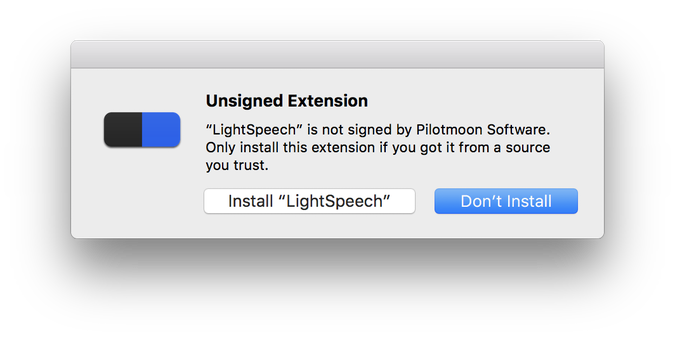
Double-click the SayText.popclipext file in Finder to open it in PopClip. You will get a warning that it’s an unsigned extension. Click the “Install LightSpeech” button.
Once installed, the LightSpeech extension will appear in the PopClip list of plugins.
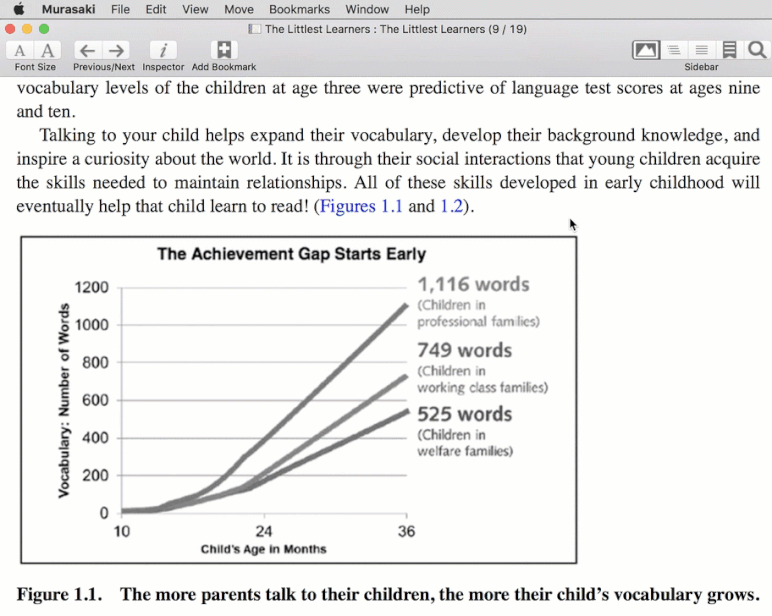
Now you can select text in any app (Murasaki the EPUB reading app in this case) and PopClip will immediately present a popover with the Say Text command, ready for a click.
With PopClip, you can work using the mouse alone. However, at times, say 1 in 20 times, I’ve found the popover doesn’t show. And that’s annoying. Thus I prefer to use the gesture defined in BetterTouchTool.
LightSpeech in a Noisy Environment
If you’re using LightSpeech in an office or a coffee shop, you may want to enable background sounds in LightSpeech Preferences. The background sounds will pause when the text-to-speech voice starts speaking, and will resume when the voice finishes speaking. Use the menu command Play → Toggle background sound for more precise control.
Tracking the Current Session
Top-left of the LightSpeech window shows the current session metrics: the duration and speed (in words per minute). While the text-to-speech voice is speaking, the current metrics display an asterix to indicate that the calculation is in progress. When the speech is complete, the metrics will update.
As specified in Preferences, the current session metrics will automatically reset if idle for 5 or 10 or 15 minutes. Alternatively, check the box for “Keep session alive” to handle the reset manually. Click the Reset button to do so.
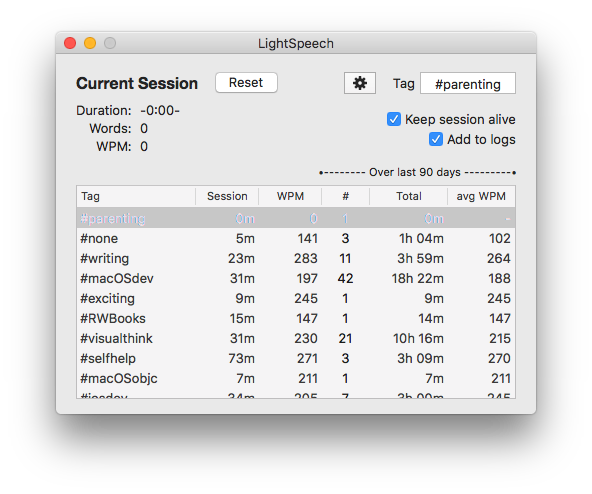
Tags for Tracking Sessions over Time
The LightSpeech app window shows summary statistics in a table.
You can select whether the app should show a summary over the last 30 or the last 90 days in Preferences.
The default tag is #none. If you’d like to summarize your past sessions by tag, ensure that a tag is set for the current session. You can double-click on an existing tag in the table to make that tag current.
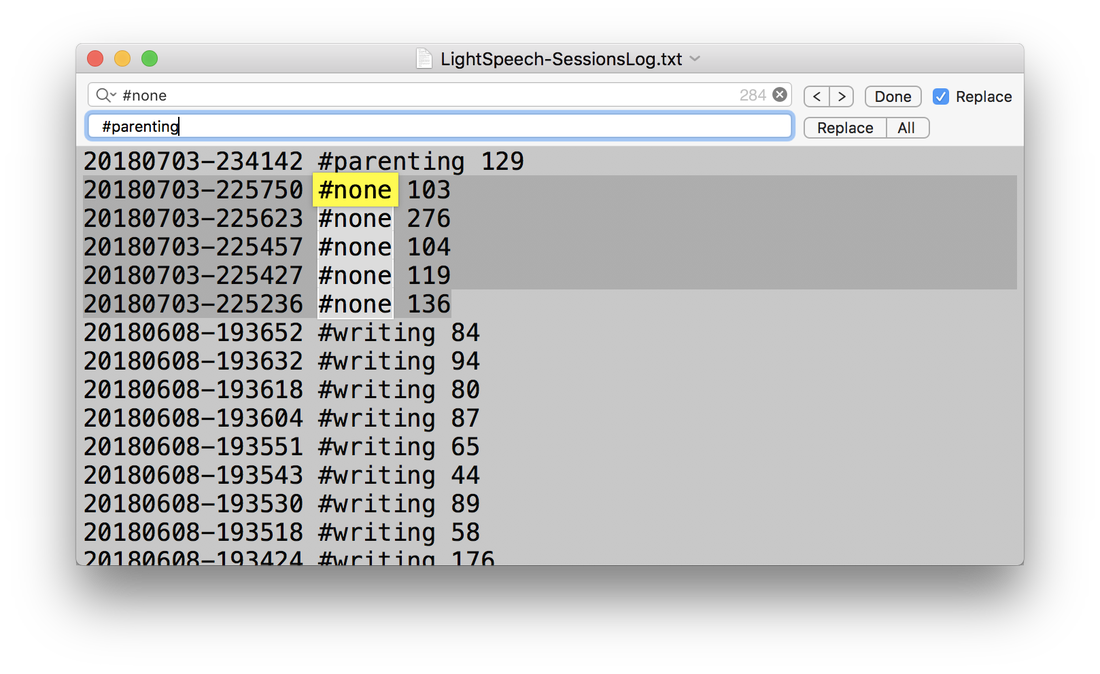
You can also edit the Sessions Log file manually to fix the tag. Go to File → Reveal Working Directory in Finder.
Open up the LightSpeech-SessionsLog.txt file in TextEdit. For example, you may want to select a range of entries and change the default #none tag using Find-Replace in TextEdit.
Customize LightSpeech
Use the shortcut ⌘ , or click the gear icon button to reveal the Preferences sheet.
Two important settings are accessed via the File menu.
First, you can specify the working directory for the LightSpeech app. This is the directory where the custom pronunciations dictionary and the sessions tracking log are located. Use File → Set Working Directory… to a shared cloud directory to use the same configuration for LightSpeech on two or more Macs. Second, select File → Open Custom Dictionary in Text Editor to add pronunciation hints for the LightSpeech app. Usually the LightSpeech-CustomDictionary.txt file will open in TextEdit. Make your edits and save.
Check for Updates
Go to the menu command LightSpeech → Check for Updates… LightSpeech checks for a new version occasionally. Uncheck the box for “Automatically check for updates” in the Updates window to disable the automatic check.
Resources
Visit the LightSpeech product website at onekerato.com for additional tips and tutorials.
PDFSpeech is a text-to-speech app optimized for reading long PDFs. The app can also build a PDF pack using the macOS Print to PDF feature. PDFSpeech is also available at onekerato.com