PDFOutliner allows you to add and edit a table of contents in a PDF.
The table of contents (TOC) shows up in the sidebar of a PDF reader application, and is a handy way to navigate through a PDF. It works on PDF reading apps on both desktop and mobile. Note that the table of contents generated by PDFOutliner is NOT printed on a page in the PDF. Instead, it is "embedded" in the PDF such that it can be used in a sidebar.
This PDFOutliner User Guide is divided into three parts:
How to use the table of contents feature in any PDF reading app
How to use PDFOutliner to create a table of contents from scratch
How to use PDFOutliner to edit an existing table of contents in a PDF
Using the Table of Contents
The PDF format is a very popular digital format, and is used extensively for publishing documents in law, business, and academics. As such, key documents like white papers, progress reports, text books, and even slide decks are often available in PDF format, and it's useful to have a way to precisely locate the information you need in these PDFs.
To browse through any long PDF, a table of contents is very useful. PDFOutliner allows you to efficiently edit the table of contents in a PDF, so that you are in control of how you navigate within the PDF, on any device. Following is a quick review of how to use the table of contents feature in typical PDF reading apps on macOS and iOS. The table of contents produced by PDFOutliner also works in PDF reading apps on Windows and Android.
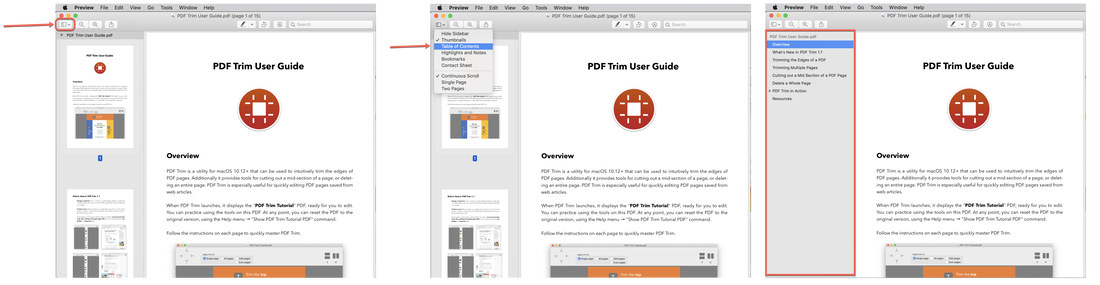
Access the TOC Sidebar in Preview on macOS When you open a PDF in Preview, the default PDF reader that ships with macOS, you will usually see the thumbnail sidebar on the left. Use the "View menu" button to show the "Table of Contents" instead. Click on the items shown in the sidebar to scroll to that heading in the PDF.
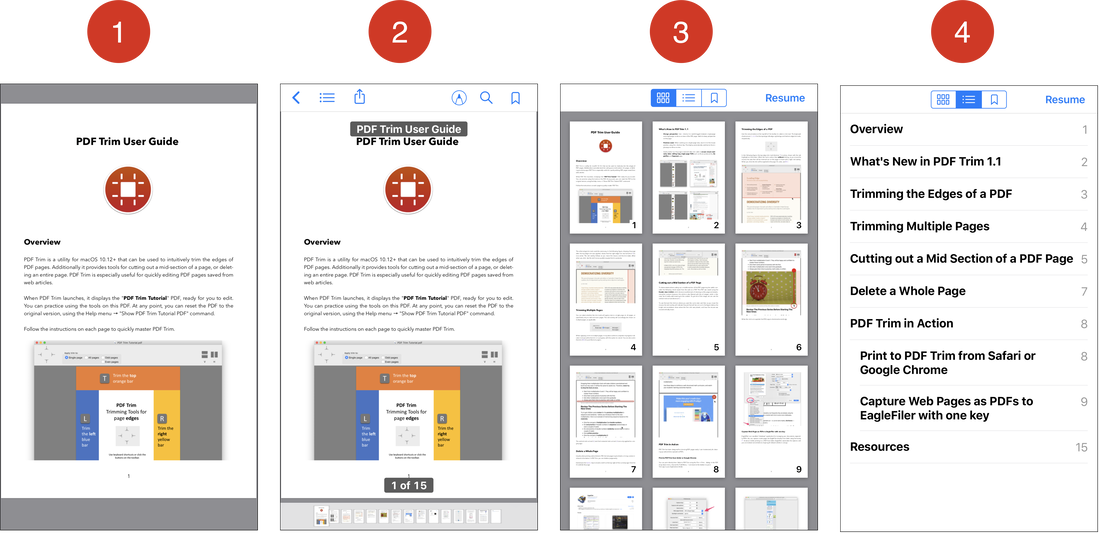
Access the TOC Sidebar on Books for iPhone When you open a PDF in iBooks on iPhone, it usually goes full screen (1). Tap the center of the page to see additional controls (2). The outline button is the second one on the top toolbar. Tap the outline button to see the thumbnail view (3) and the three-way control on the top toolbar allows you to select the table of contents.
Tap on any row to jump back to the PDF, and to the corresponding location of that heading in the PDF.
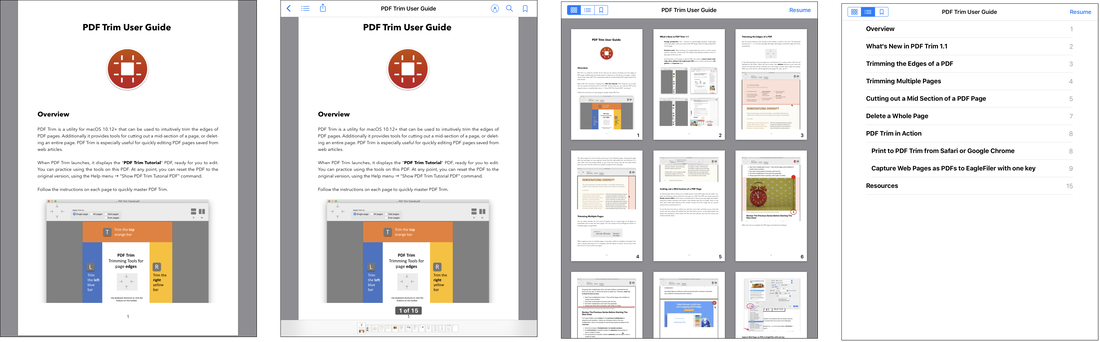
Access the TOC Sidebar on Books for iPad Similar to opening a PDF in Books for iPhone, in Books for iPad, the PDF opens in full-screen view. Then, tap the center to see additional controls in the top toolbar. Select the outline button, and in the three-way control, select the middle option to show the "Table of Contents" embedded in the PDF.
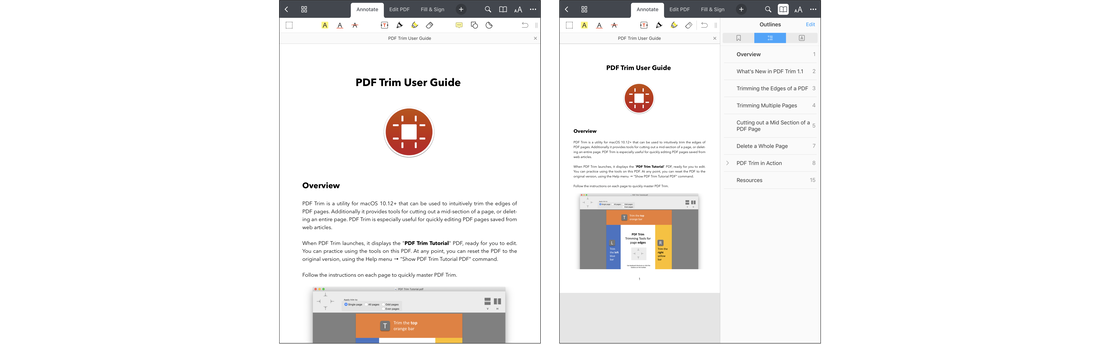
Access the TOC Sidebar on PDF Expert 7 for iPad Open the PDF in PDF Expert 7 for iPad, and click the "bookmarks" button on the top-right. The sidebar panel opens on the right, and shows the "Table of Contents" embedded in the PDF. Click any item to scroll to that heading in the PDF.
Add a Table of Contents from Scratch
PDFOutliner offers a few ways to add a new table of contents to a PDF. When you open the PDF, the right sidebar in PDFOutliner shows the table of contents, if any. This sidebar is where you work to add or edit the table of contents.
At the outset, we need to distinguish between two broad types of PDFs:
those that have text such as PDFs produced from text documents or presentations.
those that do not have text such as scanned images packaged as a PDF.
PDFOutliner provides tools to work with both types of PDFs, though which tool is most effective depends on the type of PDF.
If the PDF has text, and formatted text in particular, such that headings are styled differently than body text, then a range of tools in PDFOutliner can be used to create a new table of contents for the PDF:
MiniTOC
AutoTOC
Repeatable AutoTOC
Bot for Rapid AutoTOC
MiniTOC
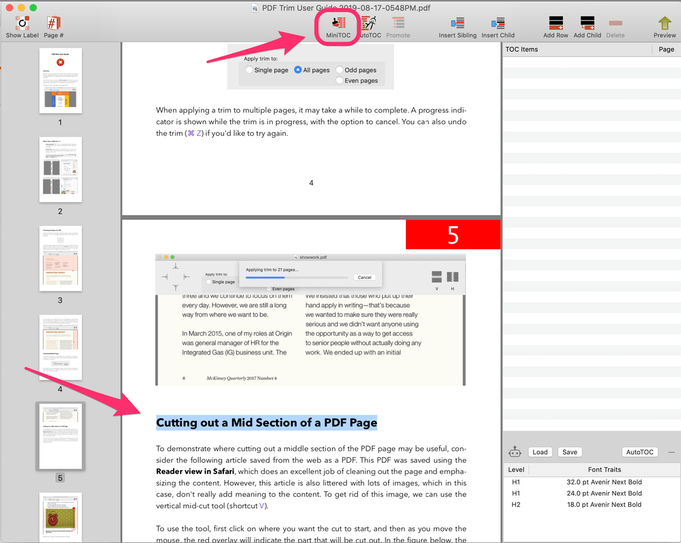
If you're looking for a simple flat TOC, and the heading text is clearly visible on the page, then simply select that text, and use the MiniTOC button on the toolbar.
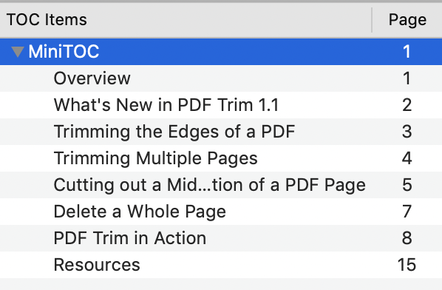
This will immediately generate a flat list of headings based on the same style as your selection. Note that the TOC items are nested one level within a "MiniTOC" item. This is to make the newly generated items stand apart from any existing TOC items the PDF may have.
If you don't like the results, simply hit the Delete button on the toolbar. The "MiniTOC" item is already selected, so this will immediately delete it and all the newly generated TOC items nested within.
If you want to keep this MiniTOC list, then you can clean it up in two stages: first, use the Promote button on the toolbar to move the child items one-level up, and outside the MiniTOC item. Second, use the Delete button to delete the selected MiniTOC item, which no longer has any nested TOC items.
Or, you may choose not to clean it up yet, and instead compare it with the TOC items generated by other tools in PDFOutliner.
AutoTOC
If the PDF has distinct text styles for each heading level, then PDFOutliner can build a nested TOC hierarchy by sequentially parsing the fonts used in the document. This technique has been named "AutoTOC".
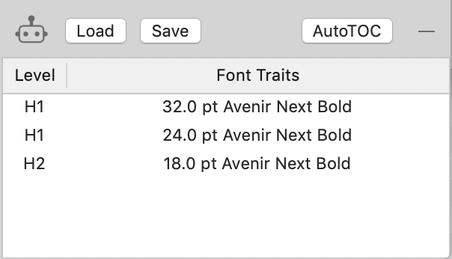
When you open a PDF in PDFOutliner, it shows you the heading styles detected in the document, in a table on the bottom right of the window. We'll refer to this as the Styles table. Note that you can select and delete any style in this table using the button just above the table, if you don't want to use that style for generating the TOC.
At this point, you can hit the Run AutoTOC button and PDFOutliner will attempt to generate a TOC by searching the document for these heading styles.
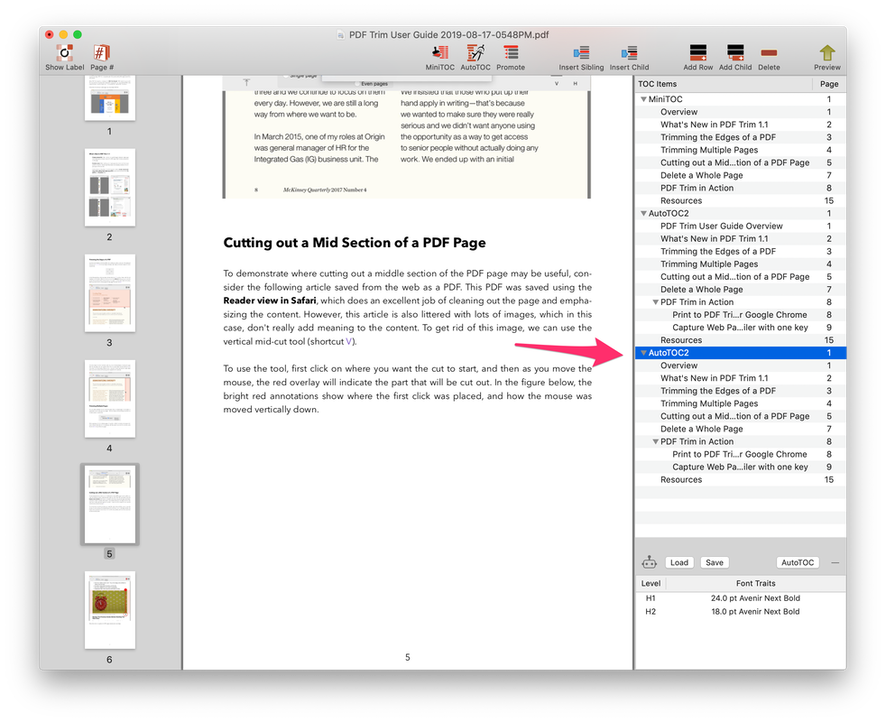
The generated TOC items are nested under a parent "AutoTOC" item. As seen, two heading levels were generated. Again, if you want to keep this TOC, simply use the Promote and Delete buttons as explained above, since the "AutoTOC" parent is already selected.
However, you can usually get better results by specifying the text styles explicitly for H1, H2, etc. To do this, we use the commands under the Outline menu.
First, clear out the Styles table using the command Outline menu → Reset H1-H2-H3 Fonts (shortcut ⌘ 0).
Next, scroll through the PDF and select a heading style for H1, such as a Chapter heading, and use the command Outline menu → Use Selection for H1 (shortcut ⌘ 1). Similarly, set up styles for H2, H3, and H4.
For the example PDF, I scrolled to a page where I could see the H1 and H2 styles next to each other. Then, I selected the headings one by one and use the keyboard shortcuts ⌘ 1 and ⌘ 2 above to re-populate the Styles table.
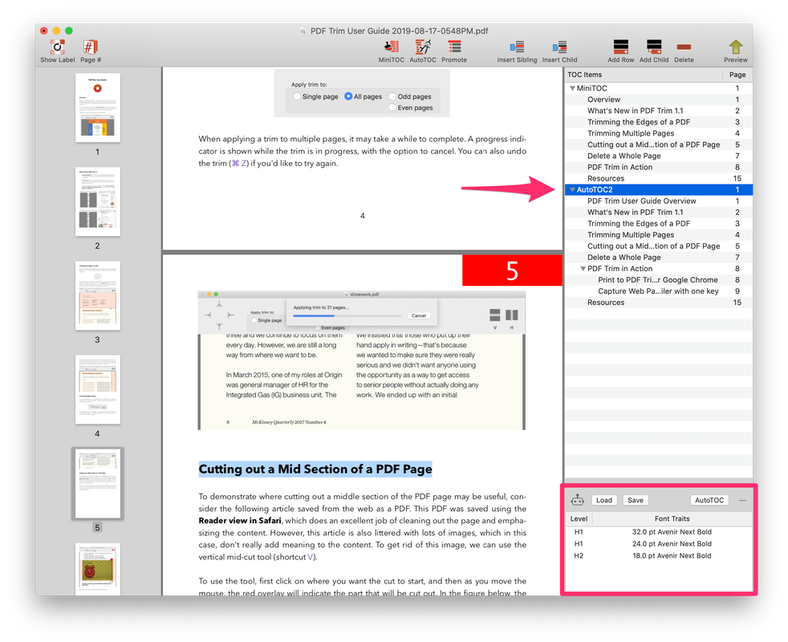
Now, when I run AutoTOC, I can ensure that exactly the styles I specified will be used to construct the TOC. The newly generated TOC items are again nested inside an "AutoTOC" item. The first item in particular is cleaner because the document's title style was excluded from construction of the TOC.
Repeatable AutoTOC
I write my app User Guides in Ulysses, and I generate the PDFs using the same style sheet. As such, I need to run AutoTOC on every PDF User Guide. If you're an author, you may similarly need to add a TOC to PDFs that use the same styling.
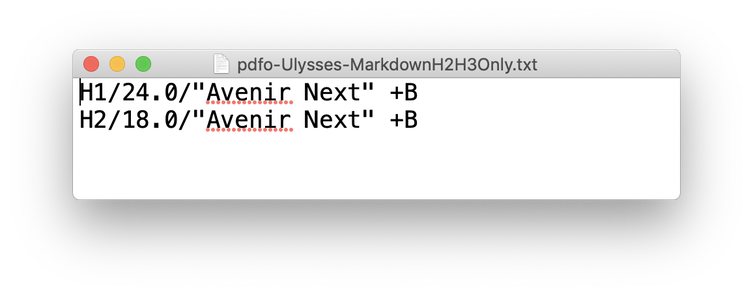
To make this easier, you can save your custom set of styles shown in the Styles table to disk as a plain text file. That's what the Save button above the Styles table does. And for the next PDF document, use the Load button above the Styles table to reset the Styles table contents. Then, you can run AutoTOC consistently on every PDF.
The exported plain text file is quite simple:
If you're generating professional documents that need a custom TOC, using the above technique to save and load your styles can make it very easy to run AutoTOC and get consistent results, quickly.
Bot for Rapid AutoTOC
The Bot button above the Styles table makes it even more convenient, by automating the following steps which would otherwise be required for every PDF you open in PDFOutliner:
Use the Load button to import a set of styles from disk
Click the Run AutoTOC button
Promote the child TOC items
Delete the "AutoTOC" item
When you click the Bot button , it will just reuse the set of Styles that you loaded previously. And, it will clean up the TOC.
If you want to generate a TOC for your PDFs using the same set of styles, then the Bot button is the fastest way to work.
Manual TOC Construction
In some situations, AutoTOC will not work, such as when there are no discernible font styles used in the PDF document. For example, scanned images of a book packaged as a PDF or even after running the PDF through OCR, the font style information is missing. The OCR only adds the text recognized on the page, but does not add formatting information i.e. style, to the PDF.
In such cases in particular, the techniques for manually constructing the TOC are useful.
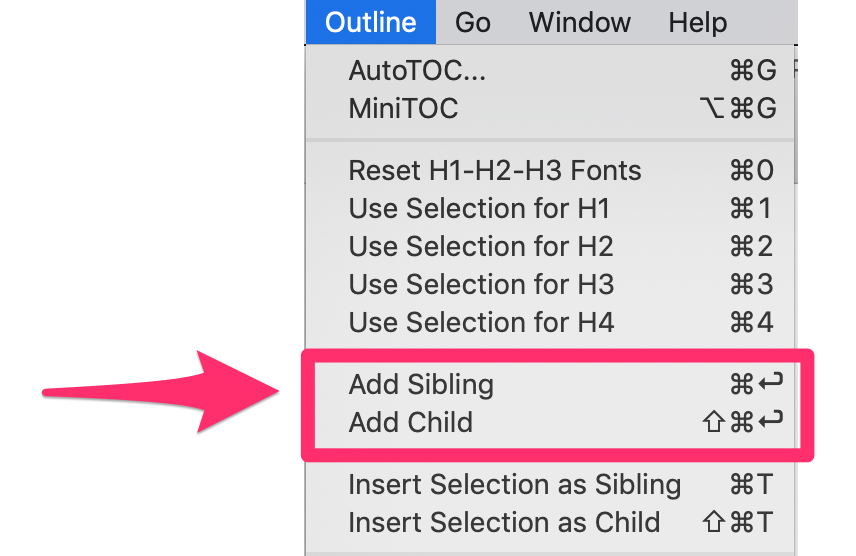
In the Outline menu, the Add Sibling and Add Child commands will add a new TOC entry corresponding to the top of the current page. To add links to a specific point on the page, see the Bullseye technique below.
You can browse through the pages of the PDF and add new TOC links into the hierarchy, and review the outline in the right sidebar. The new TOC entries will be named "Untitled" in the sidebar.
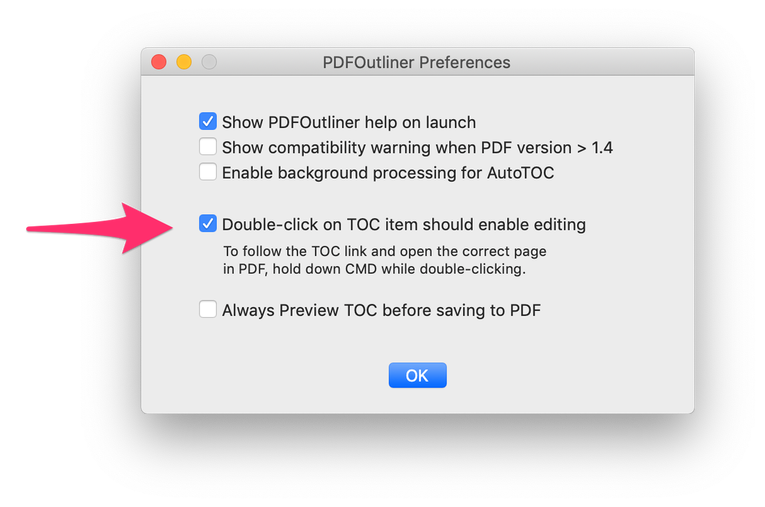
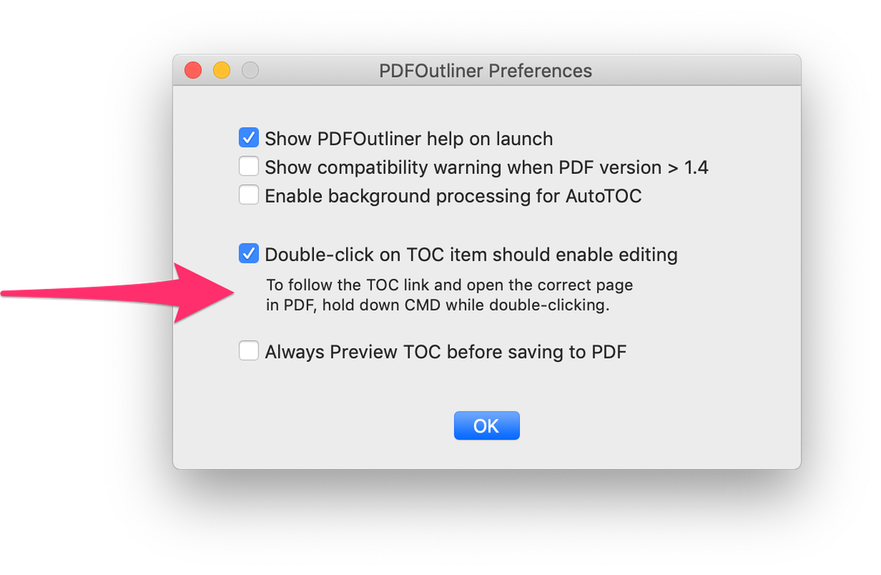
To edit the TOC entry i.e. to rename it, you should click once on it, then again. PDFOutliner's Preferences specifies what should happen on a double-click. If the option is enabled, then you can also double-click on a TOC item to start editing it. Or, if the option is not enabled, then you can hold down ⌘ key and double-click to edit the TOC item. Rename the TOC item to reflect the page contents.
Precision Manual TOC Construction
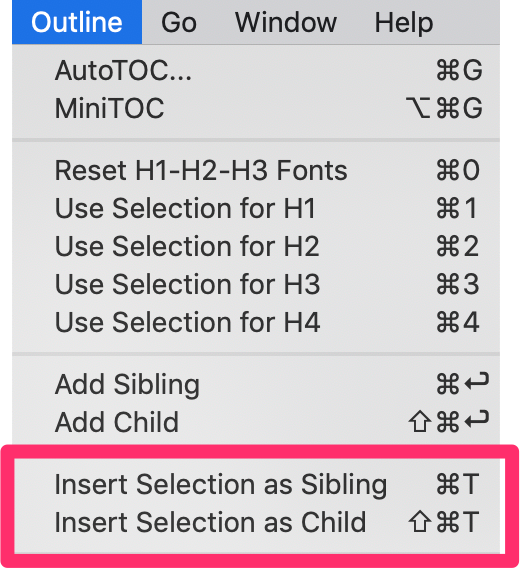
Even when AutoTOC works well, you may still want to create TOC items manually. For example, you may want to identify only the really interesting sections in the PDF, which you are likely going to come back. It could be a TOC list of interesting figures and explanations in an industry report, or a list of confusing topics in a textbook. The Outline menu has two commands, Insert Selection as Sibling and Insert Selection as Child, that allows you to select text on the page and add it to the TOC hierarchy. To use these, the text must be selectable and copyable, though it doesn't need to have style information.
Bullseye Precision Linking
The bullseye technique works for all PDFs, and is a precise way to create a TOC entry that points to a specific point on a page.
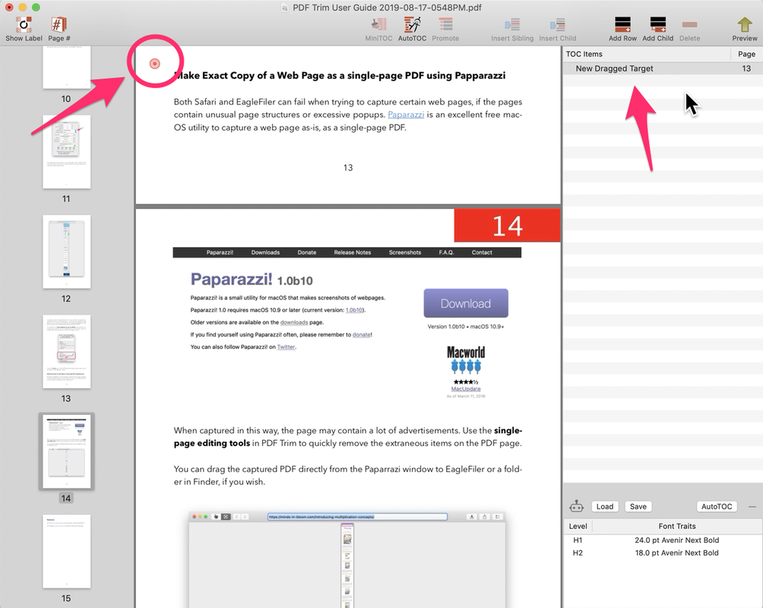
To use the bullseye, double-click on the specific point and hold. Then drag to the right sidebar between or away from other TOC items to create a new TOC entry named "New Dragged Target." A bullseye icon is briefly visible on the page where you double-clicked to confirm the link's destination.
Next, rename the TOC entry.
Edit an Existing TOC
To edit the TOC, first select the relevant TOC items in the right sidebar.
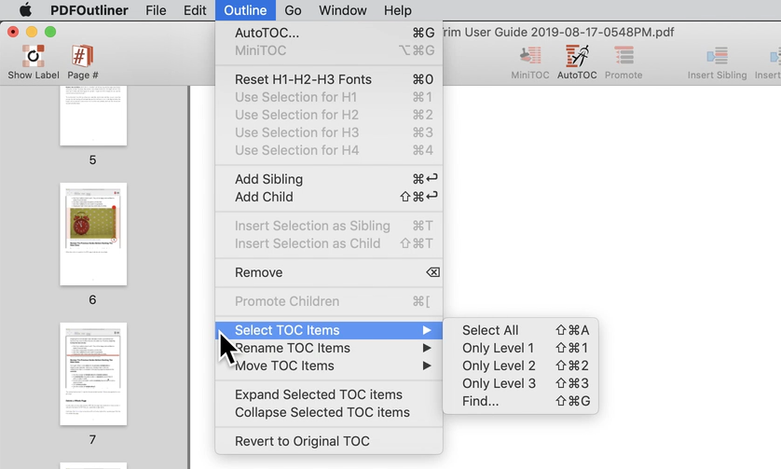
You can use the Outline menu to select specific TOC items, using the Select TOC items submenu commands.
Rename
You can rename TOC items one-by-one using the click-then-click technique, or once the item is selected, hit Enter to start editing.
Or, you can edit using the double-click, if so enabled in PDFOutliner's Preferences.
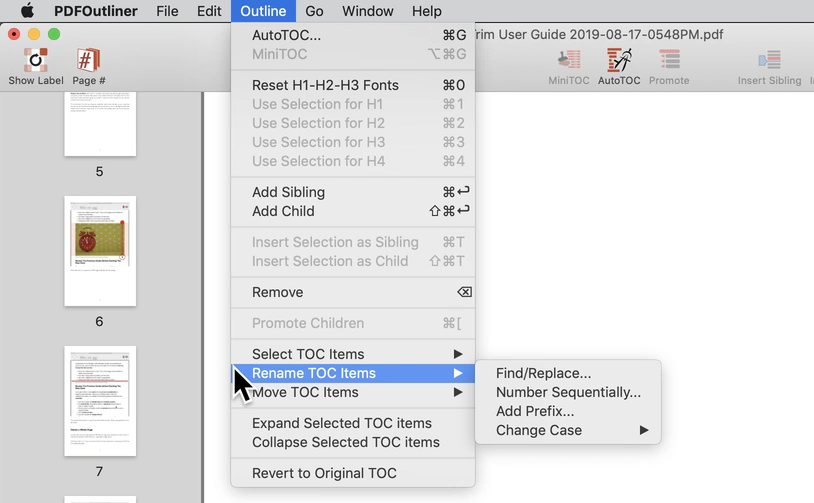
Alternatively, use the commands in the Outline menu → Rename TOC Items submenu to do any of the following editing commands:
Find & Replace to fix typos or remove unneeded characters
Sequential numbering of selected items, such as those on the top-level
Adding a prefix such as "Chapter" to each of the selected TOC items
Change the case to title case, lower case or upper case since the text copied from the PDF itself may not be formatted well enough for a TOC entry
These renaming commands will show additional sheets to allow you to configure the functionality.
Move items in the TOC hierarchy
Select items and then move them up-down or left-right in the TOC hierarchy using the Option + arrow keys shortcut.
Change the Destination of a TOC Link
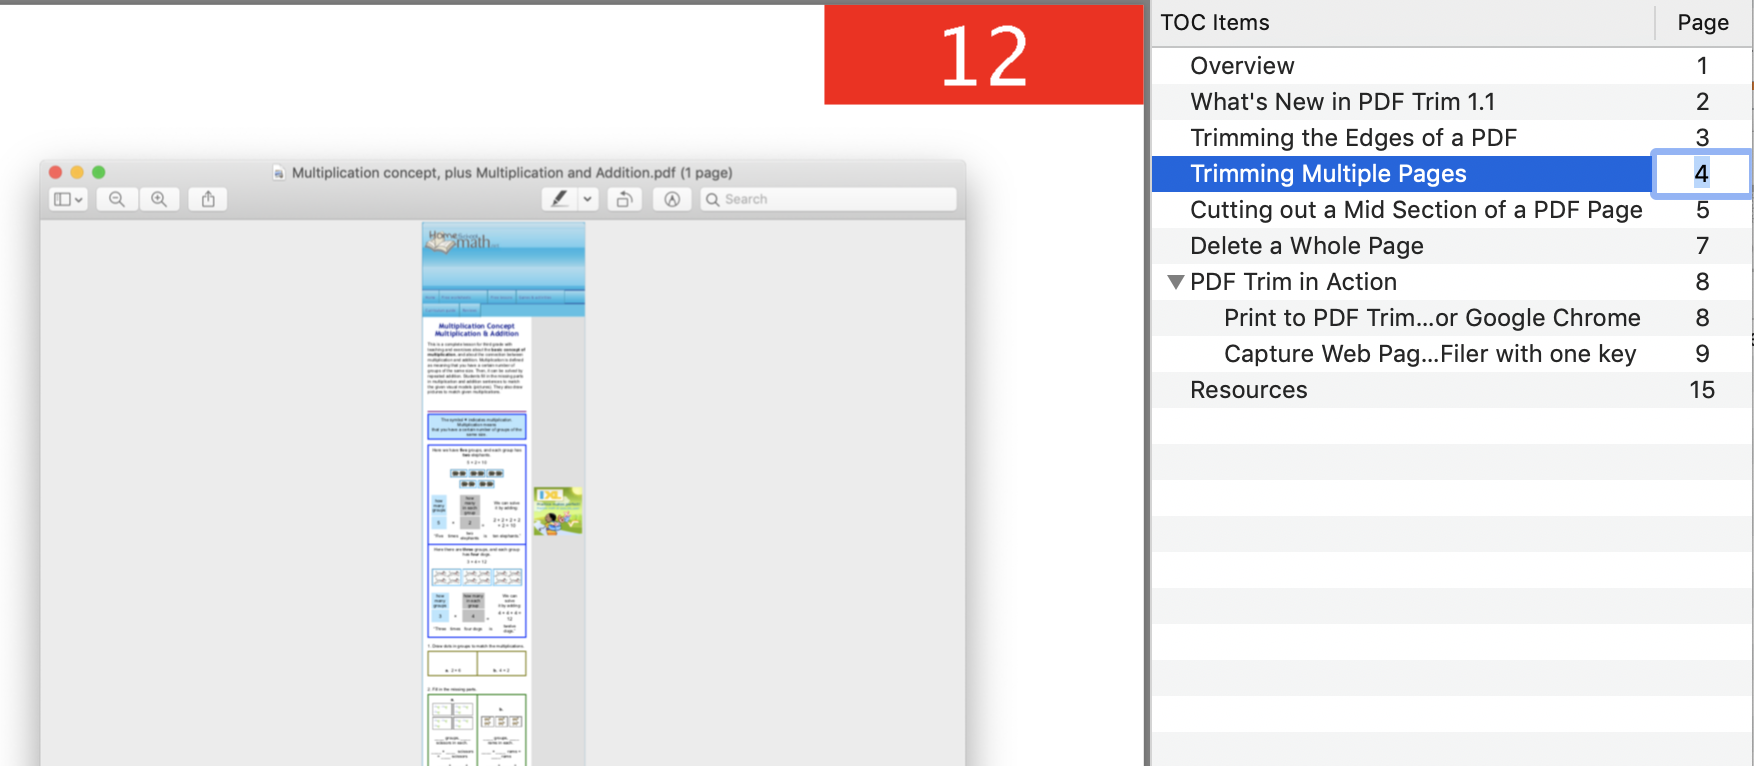
The destination of a TOC link is shown in the second column in the TOC sidebar. It shows the linked page, though it actually links to a specific point on that page.
You can directly edit the page "label" in the second column to change the link. Each page's "label", which is how the page is internally identified in the PDF, is shown in a red box on the page.
If you want to change the precise link on a page, then use the bullseye linking technique described above: double-click on the page, then hold down and drag onto an existing TOC item. This will update the link's destination.
To verify that the link has been updated, you can follow the link. Based on your PDFOutliner Preferences, hold down ⌘ and double-click on a TOC item to follow the link.
Summary
PDFOutliner provides several techniques to edit the Table of Contents (TOC) in your PDF. This user guide covers the following features:
AutoTOC Let PDFOutliner auto-magically build a TOC for your PDF.
MiniTOC Provide sample heading text and let PDFOutliner find others.
Push Text Drag-and-drop text from PDF directly into TOC.
Solo Editing Click to edit any TOC item, both the title and page number.
Bulk Renaming Use menu commands for find/replace, and sequential numbering of selected TOC items.
Nudging into Shape Move TOC items to indent/outdent and craft a TOC hierarchy.
Bullseye Linking Accurately position TOC links on a page.
AutoTOC
AutoTOC is an automated way to generate a TOC for your PDF. PDFOutliner will analyze the range of fonts used in the PDF, and attempt to tease out a hierarchy of headings. This feature is available via the Outline menu > AutoTOC… command. AutoTOC works great for:
PDFs produced by a word processing or page layout application such as Word 2011 for Mac, Pages ’09, or InDesign CS6. In such PDFs, the fonts used for headings and body text are clearly distinguishable which enables PDFOutliner to extract the TOC structure by interpreting font information.
When to use AutoTOC:
You can create a PDF from many Mac applications using the OS X “Save as PDF…” command. In such cases, the generated PDF does not have a TOC. If the original content uses different fonts for various headings, you can use AutoTOC feature in PDFOutliner to quickly parse the PDF and automatically build a TOC.
If you have PDF for professional use such as handbooks and reference manuals, you may wish to extract chapters and sections using the OS X Preview application. Typically, you will lose any navigable TOC embedded in the PDF. Use the AutoTOC feature in PDFOutliner to quickly reconstruct the TOC for the extracted pages.
AutoTOC may NOT yield good results for:
PDFs with scanned or even OCR content because font information is either missing or inadequate to decipher a structure for the PDF.
PDFs related to financial reports where font differences may be minimal and font characteristics such as all capitals or small caps are used to visually identify “heading” fonts.
MiniTOC
MiniTOC is a pattern-matching feature for generating a list of TOC entries.
The user must first select some text in the PDF, and then invoke the MiniTOC feature via the Outline menu > MiniTOC command. PDFOutliner will interpret the “sequence of fonts” in the user-selected text, and then parse the entire PDF document to build a list of similar text patterns.
MiniTOC does not build a hierarchy of TOC items. The MiniTOC command always results in a list.
MiniTOC works great for:
When a heading is not a single font but a combination of fonts - for example “Ch 6. Proteins” where the font for “Ch 6” may be larger than the font of the rest of the chapter title. In such situations, select the text including both fonts and run the MiniTOC command to build a list of large font followed by small font patterns in the PDF.
When to use MiniTOC:
To generate a focused list of items such as Table of Figures or markup such as “Tips/Notes/Warnings” or any such identifiable content in the PDF which uses distinctive font(s).
To extract a long list of headings which all use the same font, in preparation for using the manual editing commands provided by PDFOutliner to convert a list of TOC items into a structured hierarchy.
When the PDF has “running headings” with a mix of closely-matched font styles as often found in financial reports.
When AutoTOC ignores a particular heading style because its frequency is relatively too low or too high. Use MiniTOC to extract all occurrences of that heading into a list.
When the font information in the PDF has “irregularities” such that parsing the fonts using AutoTOC leads to situations where heading text is split up over 2 or more TOC items. When using MiniTOC, the entire selected text is treated as a single TOC item and a similar pattern (including font irregularities) is searched through the PDF.
Push Text
The Push Text feature allows you to select any text in the PDF and quickly insert it into the Table of Contents (TOC). This feature is implemented using both the menu and drag-and-drop.
When text is selected in the PDF, two commands under the Outline menu become active: (1) Insert Selection as Sibling; and (2) Insert Selection as Child. These commands will push and insert the selected text into the TOC, relative to the currently selected TOC item, if any.
You can also customize the toolbar to add buttons to trigger the Push Text commands.
Alternatively, you can drag and drop text from the PDF directly into the TOC. Take care to use a single mouse click to select and drag PDF text because a double-click in the PDF triggers the “Bullseye Linking” feature new in PDFOutliner version 1.4, discussed later in this guide.
When to use Push Text:
If you are skimming the PDF page-by-page, take a few moments to select interesting text and push it into the TOC to build a highly-customized TOC to suit your needs for quick lookups. For example, when reviewing a legal agreement, mark out the beginning of important clauses and insert it into the TOC.
When it makes sense to organize TOC items in special groups such as “Review Worthy” or “Insights” or “Confusing” according to your needs. Both AutoTOC and MiniTOC adhere to the page order when building the TOC, whereas you have complete control in structuring the TOC when using the Push Text feature.
When the PDF has too many different fonts such that AutoTOC discards many of the low frequency fonts and only constructs an incomplete TOC.
When the PDF has too few fonts such that AutoTOC and MiniTOC generate too many TOC entries. Instead of deleting many unwanted TOC items, it may be easier to use Push Text feature to only add wanted items to the TOC.
When the font information in the PDF has “irregularities” such that parsing the fonts using AutoTOC leads to situations where heading text is split up over 2 or more TOC items. When using Push Text, the entire selected text is inserted as a single TOC item.
Solo Editing
The “Add Row” and “Add Child” toolbar buttons will insert a new “empty” TOC item with a link to the top of the currently open page of the PDF. Unlike the Push Text commands, the TOC item created this way does not point to any specific point on the page. Use these toolbar buttons when you want the PDF to open right to the top of a particular page.
Any TOC item and its page number can be edited in place.
First select the TOC item. Hit enter/return to start editing the TOC title. Hit Tab to switch to editing the page label.
Alternatively, hold down CMD key and double-click on the TOC item’s page title or page label to begin editing. This is the default behavior. In the Preferences dialog for PDFOutliner version 1.4 (shortcut CMD-comma) you can easily change this behavior such that double-clicking any TOC item will immediately allow editing, and to follow the link, hold down the CMD key and double-click.
Solo Editing is a quick way to fix typos or trim the title of the TOC item.
For selecting multiple TOC items, use CMD-click and SHIFT-click for similar selection behavior as in other Mac OS X applications. You can also use the Outline menu > Select TOC items submenu commands if you want to select all TOC items or TOC items at a specific level in the hierarchy.
For renaming multiple TOC items quickly, PDFOutliner provides four commands:
Find/Replace for fixing spelling mistakes, substituting abbreviations and other editing tasks.
Sequential numbering of selected TOC items, including an optional prefix to organize TOC items into neat sequences.
Add a Prefix such as “Ch ” before the selected TOC items to distinguish chapter headings from the others, if so required.
Change case to titlecase, uppercase or lowercase.
Nudging into Shape
Any TOC item can be selected and moved in the TOC hierarchy by holding down the Option key and using the arrow keys for direction. The right arrow key will indent (“demote”), the left arrow key will outdent (“promote”), the up arrow key will move it above its sibling and the down arrow key will move it down the list. Only the left and right arrow keys change the level of the selected TOC item in the TOC hierarchy.
The nudging shortcuts (Option and arrow keys) help you easily convert a flat list of TOC items into a hierarchy. These are especially useful in quickly cleaning up the list of TOC items generated using MiniTOC and Push Text commands.
For a PDF you intend to skim page to page, use the Push Text commands to create a list of interesting TOC items and subsequently organize it into a meaningful TOC hierarchy using the nudging shortcuts.
Bullseye Linking
Bullseye Linking is a new feature in PDFOutliner version 1.4.
You can create a TOC link to a precise point on the PDF page.
To get started, double-click anywhere on the PDF page and start dragging. A red bullseye symbol will appear where you double-clicked and another will follow the mouse. You can drag this specific location to the TOC.
If you drag the bullseye on top of an existing TOC item in the TOC hierarchy, its link will be updated to point to the bullseye.
You can also drag the bullseye to the TOC hierarchy and use the visual cues to insert a new TOC item at the specified location in the hierarchy.
The bullseye point you select will become the top-left corner of the PDF view when you follow the TOC link.
When to use Bullseye Linking:
For detail-heavy PDFs such as engineering drawings where you want to zoom into a specific view of the PDF. When following the TOC link, the page will be repositioned such that the bullseye’s location becomes the top-left corner of the view. The actual zoom with respect to this top-left corner is controlled independently in your PDF viewer.
For PDFs containing scanned documents where no text is selectable and consequently the Push Text feature doesn’t work. Use bullseye feature in PDFOutliner to put together the TOC for your scanned documents. For example, add a TOC to a signed and scanned legal agreement linking into specific clauses of interest.
For custom placement of the top-left corner corresponding to a TOC item. When using the Push Text feature, the view may be “too tight” with the heading text squished in the top-left corner. Use bullseye linking to drag over and override the link for any existing TOC item.
Please also visit the PDFOutliner support page at (www.onekerato.com/support.html) to offer feedback and suggestions to guide the development of PDFOutliner.